How to Setup Your Email Account on Thunderbird
1. Open Thunderbird.
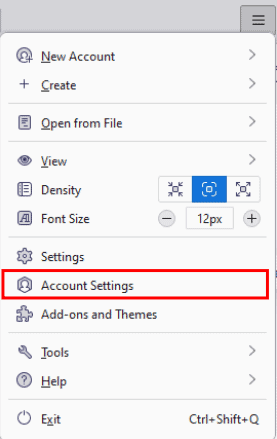
2. Click Tools or click the Application menu button
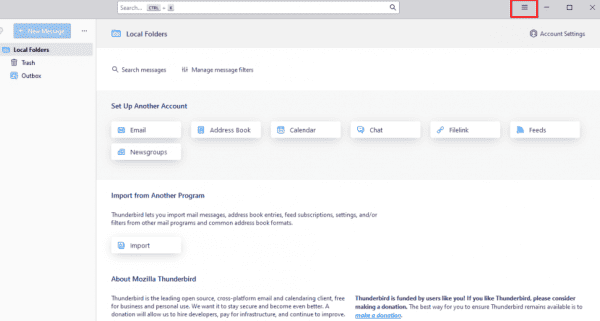
3. Select Account Settings.
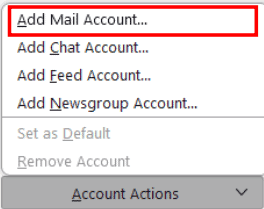
4. At the bottom of the left pane, click Account Actions.

5. Select Add Mail Account.
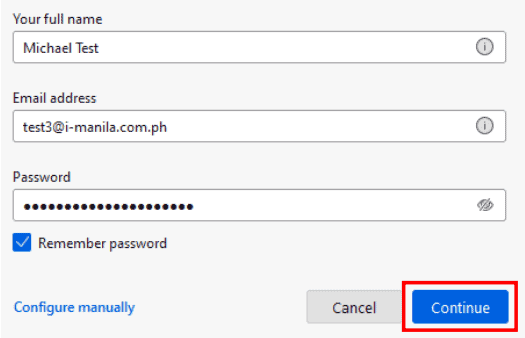
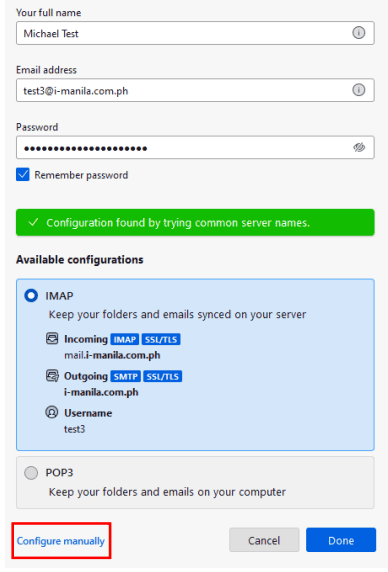
6. Enter your email account details and press Continue.
o Your Name: How you want your name to appear in emails (example: Jane Test)
o Username/Email Address: Your full email address (example: [email protected])
o Password: Your email password
o Remember the password: We recommend that you keep this checked
7. Press Configure manually and edit the server names, ports, and IMAP/POP to manually set
up the account. IMAP synchronizes the email on your computer with the contents of your
account on the server, while POP simply downloads the inbox.
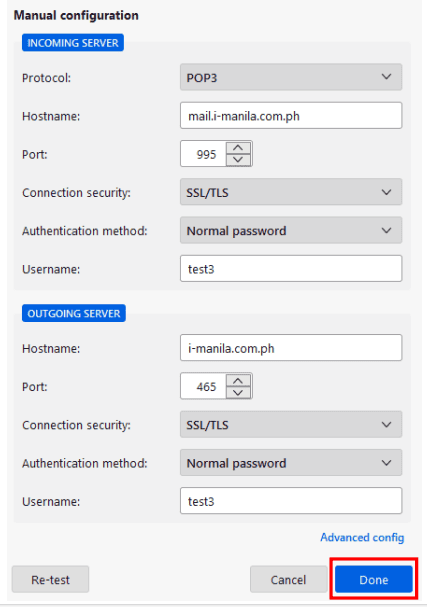
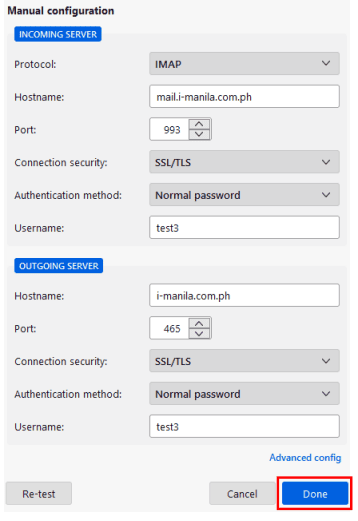
- 8. Fill in the following information depending on the incoming protocol you chose:
POP
Incoming Authentication: We recommend a Normal password.
ncoming SSL: Your preference. If you choose SSL/TLS, change the Incoming Port to
995.
Incoming Port: 110
Incoming Server Hostname: mail.domain.com
Incoming (Type): POP
Outgoing Authentication: We recommend a Normal password
Outgoing SSL: Your preference. If you choose SSL/TLS, change the Outgoing
Port to 465
Outgoing Port: 587
Outgoing Server Hostname: mail.domain.com
- IMAP
Incoming (Type): IMAP
Incoming Server Hostname: mail.domain.com
Incoming Port: 993
Incoming SSL: Your preference. If you choose SSL/TLS, have the incoming
server and port reflect their appropriate SSL settings.
Incoming Authentication: We recommend a Normal password.
Outgoing Server Hostname: mail.domain.com
Outgoing Port: 465
Outgoing SSL: Your preference. If you choose SSL/TLS, have the outgoing
server and port reflect their appropriate SSL settings.
Outgoing Authentication: We recommend a Normal password
9. Click Done.
10. Wait for the mail client to finish verifying the email settings.